If you’re unsure about curling your hair, it might be a bit tricky at first. But with some practice, you can master it and create amazing curls and waves. Whether you’re using a curling wand or an iron, there’s a bit of a learning curve. With all the different tools available, it might seem overwhelming, but don’t worry – with time and effort, you’ll be able to style your hair like a pro.
Main Contents
Choosing the Right Tool
Deciding between a curling wand and an iron can be tough. Each has its own advantages. A curling iron has a clip that helps hold your hair in place for curls, which some people find helpful. But others prefer a wand because it’s easier to use without a clip.
Once your wand is heated up, wrap your hair around it, holding the ends for the best results. This works great for creating beach waves because it keeps the ends straight, enhancing the overall look. When it comes to demonstrating curling techniques, especially for beachy waves, using a wand is often the preferred choice.
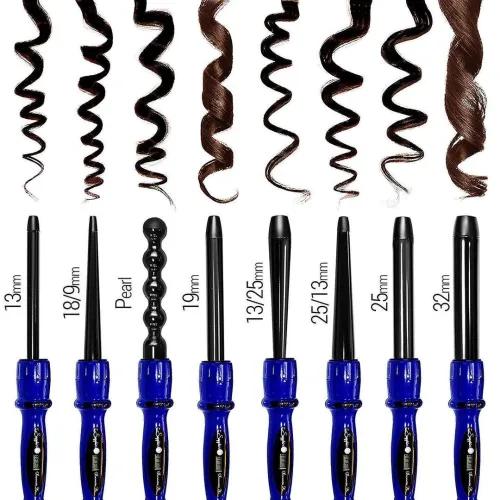
Recommended Barrel Sizes:
- 5-inch Barrel: Perfect for defining curls in naturally curly or coiled hair.
- 1-inch Barrel: If you’re only getting one tool, go for this size. Use larger sections of hair for looser curls or waves, and smaller sections for tighter curls.
- 1.21-inch Barrel: Opt for this size for a relaxed beach wave look, especially if your hair holds curls well.
- 1.5-inch Barrel: Great for those with long hair, offering flexibility in styling
How to Get Perfect Curls: What You’ll Need
Here is all you need to know about how to curl your hair professionally:
- A ceramic curling iron or curling wand that contains tourmaline will be less likely to harm hair when heated up.
- These hair products are heat-protectant, protecting strands from harm from hot styling equipment. One of our faves is the thermal polymer-based OUAI Heat Protection Spray, which helps to produce wholesome, frizz-free curls.
- Use a soft hairbrush that can easily slide through both dry and damp hair.
- Clips for hair sectioning: Clips make putting up hair sections incredibly quick and flawless, especially in hard-to-reach areas.
- Hairspray: You can maintain your hairstyle while retaining its natural movement, soft texture, and gloss by using a flexible hold hairspray.
Step-by-Step Guide to Curling Your Hair:
Curling Method 1: Simple Daily Curls
Perfect for beginners, this foundational approach sets the stage for mastering more advanced techniques.
- Prep and untangle: Begin with completely dry hair to prevent breakage. Use a brush to detangle.
- Heat up your tools: Select your curling iron and adjust the temperature to prevent damage. Lower settings work best, such as 400°F for thin hair and 425°F for thicker textures.
- Section and protect: Divide hair into one-inch segments, starting from the bottom, and apply heat protectant.
- Curling technique: Wrap each hair strand around the iron barrel, holding it vertically with the tip pointing downwards. Hold briefly, then release and allow to cool before touching. Repeat for all hair sections.
- Finishing touches: For a natural look, gently comb or brush through the curls after curling your entire head.
Curling Method 2: Twist-and-Turn Technique for Tight Curls
- Prepare your hair: Section your hair as you did in Curl Method 1 and apply heat protectant evenly throughout.
- Brush and twist: Take a one-inch section of hair and spritz it with hairspray. Begin twisting the section tightly from the roots to the tips.
- Curl with the wand: Wrap the twisted hair segment around the barrel of the curling wand in the same direction it was twisted (either towards or away from the face). Hold the curl for an additional 10-15 seconds to achieve a defined spiral shape. Once curled, carefully pin the curl to allow it to cool and set.
- Repeat: Continue this process for each section of hair, ensuring that each twisted strand is wound consistently around the curling iron.
- Set the style: Once all sections are curled and pinned, allow them to cool completely. Then, remove the pins and gently shake out your curls to add volume and loosen the spirals. For long-lasting curls, lightly mist your hair with hairspray to hold the style.
Conclusion
In conclusion, this guide offers a detailed guide for those seeking to achieve professional-looking curls at home. By following our suggestions, the process becomes more manageable and less intimidating. We trust that with these tips, you’ll be able to create the hairstyle you envision with greater confidence